
Example of using cdc in delta tables applying cdf (Change Data Feed) in Databricks

CDC (change data capture) is an integration pattern widely used when we talk about delivering data changes in other systems, the concept is very simple, recognizing when data has changed in the source system, these changes are captured and inserted into some target system. Let's imagine the following scenario, I have a table in sqlserver in the cloud and I want to update the same table in a local database, the tool identifies changes in the table of type INSERT/UPDATE/DELETE, takes the changed rows and in the destination does a check based on the table ID, if the A record does not exist in the destination table, it does an INSERT operation, if the record already exists and there was a change in the row, it makes an UPDATE on the changed field, if the row was deleted it deletes in the target table. When we talk about Big Data, things tend to change a little, all these changes we capture are saved in some file format (parquet, avro, etc.) of operation that the data suffered in the origin, for example, when we work with the capture of data from MySQL (BinLog) the file comes with a column called Type that informs the type of the operation (INSERT/UPDATE/DELETE) so it is easy do the loading process taking only the operations != 'DELETE'.
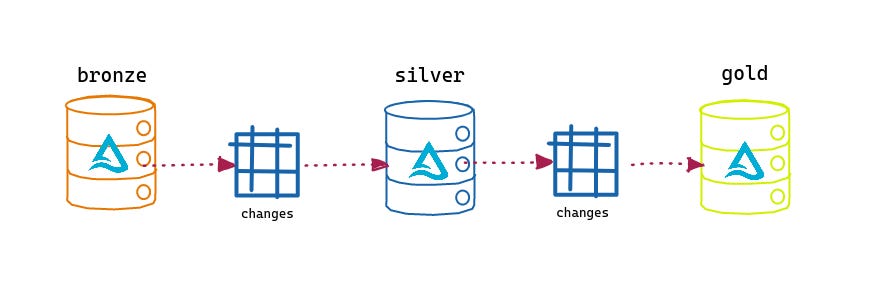
For this data to be loaded into TRUSTED, deduplication is done using a PARTITION BY function (generally done on top of the ID), where among several versions of the record, the last record captured in the origin is selected. You see, in RAW we have all versions of the same record (table rows). In this experiment we are going to do something interesting, we are going to do CDC using Databricks delta tables, and test a new feature called CDF (Change Data Feed). First Let's show you how the CDC process is done, let's imagine a scenario where we already have our data in the BRONZE layer and we want to take this data to the SILVER layer, for that we make an upset of data from a source table using a MERGE operation of SQL.
MERGE INTO customer_silver target
USING (
  SELECT
    id,
    name,
    address,
    email,
    operation,
    operation_date
  FROM
    (
      SELECT
        *,
        ROW_NUMBER() OVER (
          PARTITION BY id
          ORDER BY
            operation_date DESC
        ) AS rank
      FROM
        customer_bronze
    )
  WHERE
    rank = 1
) AS source ON source.id = target.id
WHEN MATCHED
AND source.operation = 'DELETE' THEN DELETE
WHEN MATCHED
AND source.operation != 'DELETE' THEN
UPDATE
SET
  *
  WHEN NOT MATCHED
  AND source.operation != 'DELETE' THEN
INSERT
  *
The MERGE operation inserts the data into the destination table based on some conditions, first a sql command is made to get the most recent record, then the MATCHED is made based on the customer_bronze table ID with the customer_silver source ON source.id = target.id, if the field data source.operation = 'DELETE' the row will be deleted from the target table, if the ID exists in the target table and the source.operation != 'DELETE' the row is updated in the target table, if the ID exists only at the source, the data is inserted into the target table. The operation is very simple, it works perfectly, but when we are dealing with a gigantic table, this process can be a little time consuming, because the operation will compare row by row of both tables and apply the operations, for this the CDF was implemented (Change Data Feed) the idea is simple, capture only the changes that the source table has suffered and update in the destination, but calm down, we will demonstrate this in the code. First let's load some libraries.
from pyspark.sql.functions import *
from delta.tables import *
In the code below we will create two tables and enable the feed, for more information about CDF see https://docs.microsoft.com/en-us/azure/databricks/delta/delta-change-data-feed
In this case I created the table structure and enabled the change of the feed only for the table in SILVER, I could do the same thing for the table in BRONZE, but in this example we are going to change things a little.
DROP TABLE IF EXISTS salaryDSBronze;
DROP TABLE IF EXISTS salaryDSSilver;
DROP TABLE IF EXISTS salaryDSGold;

CREATE TABLE IF NOT EXISTS salaryDSSilver (
  id string,
  experience_level string,
  job_title string,
  salary string,
  salary_currency string
) USING DELTA TBLPROPERTIES (delta.enableChangeDataFeed = true);

CREATE TABLE IF NOT EXISTS salaryDSGold (
  job_title string,
  salary_currency string,
  media_salary float
) USING DELTA;
Now let's load a file that I found on the internet, referring to salaries for positions within the data science area, after loading I write the dataframe in the default.salaryDSBronzetable
spark.read\
   .option("header","true")\
   .csv("dbfs:/FileStore/tables/salaryDataSciencelimited.csv")\
   .write.format("delta")\
   .mode("overwrite").saveAsTable("default.salaryDSBronze")
Now let's enable the Feed in the salaryDSBronze table and insert the data from the salaryDSSilver
ALTER TABLE salaryDSBronze SET TBLPROPERTIES (delta.enableChangeDataFeed=true);
INSERT OVERWRITE salaryDSSilver TABLE salaryDSBronze;
Doing a SELECT on the table, we have our cute data!
SELECT * FROM salaryDSBronze;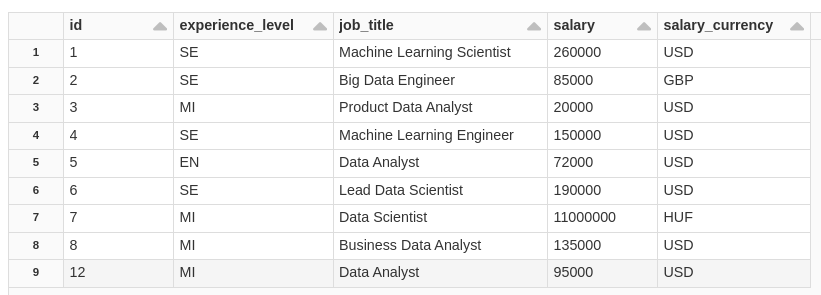
To see the version history of the table run the command below
DESCRIBE HISTORY salaryDSBronze;
See that this table has 2 lines, each line of this is a version of the table, with each change in the table a version is generated, with this feature it is possible to TIME TRAVEL to a specific version, audit or even revert to a version of the table in case of an unsuccessful operation etc.. in the example below I went back to version 0 of the table. We will not go into this subject now, in another post we will talk about it in detail.
SELECT * FROM salaryDSBronze VERSION AS OF 0;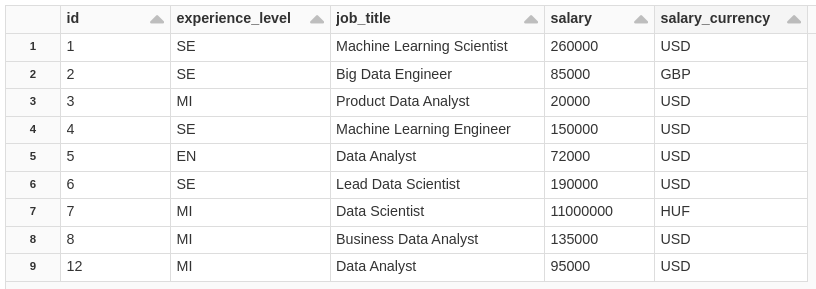
So, where do I see the table row-level interactions? well, for that we need to access this table of changes, as we are doing everything in sql the responsible function for this is table_changes(), for the python API the same is .option("readChangeFeed", "true") Each line changed from the table generates a version number, so for you to retrieve this information you need to define a range, initial and final value, example:
SELECT * FROM table_changes('table', 1,5)
the command will return the lines between version 1 and 5, if I set only the beginning, it will display everything from that number. example
SELECT * FROM table_changes('table', 1), let's go to the example below
SELECT * FROM table_changes('salaryDSBronze', 1)Notice that the above command didn't return anything, as we haven't made any changes to the salaryDSBronze source table yet, let's do some operations on that table and check the result.
Let's simulate operations on BRONZE, as if lines were added via spark.write or another process that updates, inserts or deletes lines.
DELETE FROM salaryDSBronze WHERE id = 12;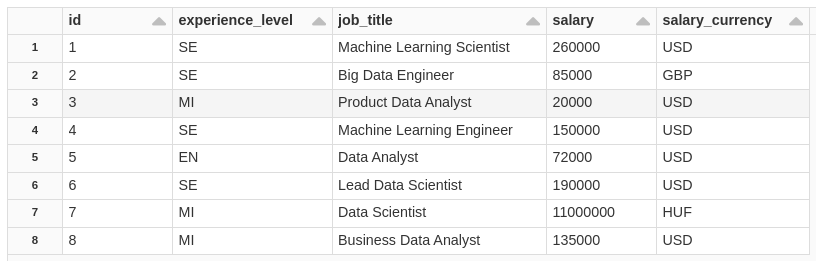
We deleted ID=12, now let's see the changes made to the table
SELECT * FROM table_changes('salaryDSBronze', 1)
see that ID=12 has undergone a DELETE change and _commit_version=12, remembering that this field receives an incremental value
now let's see the history of our table, notice that we have version=2 that is, it suffered a DELETE operation
DESCRIBE HISTORY salaryDSBronze;
Now let's see how our table is in SILVER, notice that it still contains ID=12
SELECT * FROM salaryDSSilver;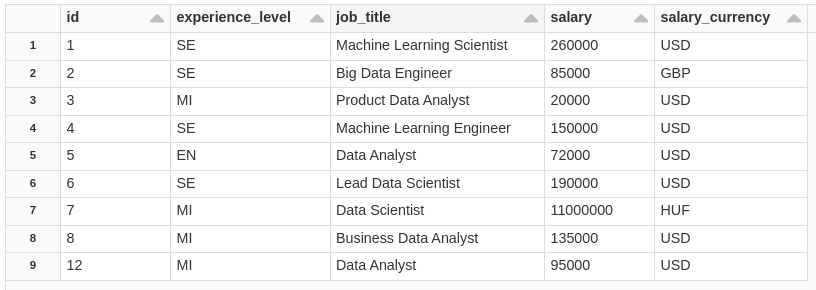
Now we are going to update our SILVER table based only on the BRONZE changes, before when we did the MERGE, we did the line-by-line check, now we only take the changes made to the BRONZE table and we MERGE the SILVER, and this is very simple, see .
MERGE INTO salaryDSSilver USING (
  SELECT
  *
FROM
  (
    SELECT
      *,
      RANK() OVER (
        PARTITION BY id
        ORDER by
          _commit_version DESC
      ) AS RANK
    FROM
      table_changes('salaryDSBronze', 2)
    WHERE
      _change_type != 'update_preimage'
  )
WHERE
  RANK = 1
) AS bronze_cdf ON bronze_cdf.id = salaryDSSilver.id
WHEN MATCHED AND bronze_cdf._change_type = 'delete' THEN DELETE
WHEN MATCHED AND bronze_cdf._change_type != 'delete' THEN UPDATE SET *
WHEN NOT MATCHED AND bronze_cdf._change_type != 'delete' THEN INSERT *;
consulting the table.
SELECT
  *
FROM
  salaryDSSilver
ORDER BY
  CAST(id AS INT) ASC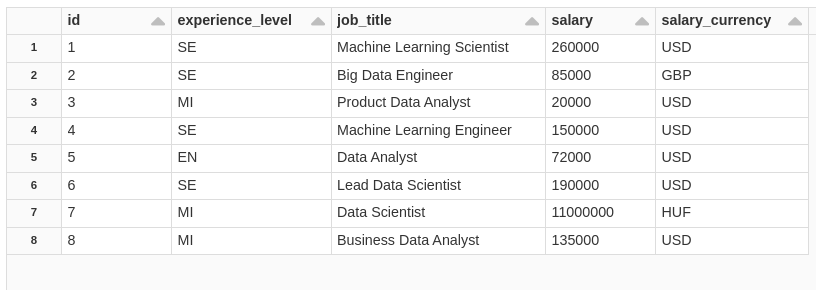
Very cool, right, MERGE only took the changes and applied them, simple and very fast. Now let's do an INSERT into the source table.
INSERT INTO salaryDSBronze VALUES ('9','SE','Data Scientist','160000','USD');
INSERT INTO salaryDSBronze VALUES ('11','SE','DataOps Engineer','19000','USD');

SELECT * FROM salaryDSBronze;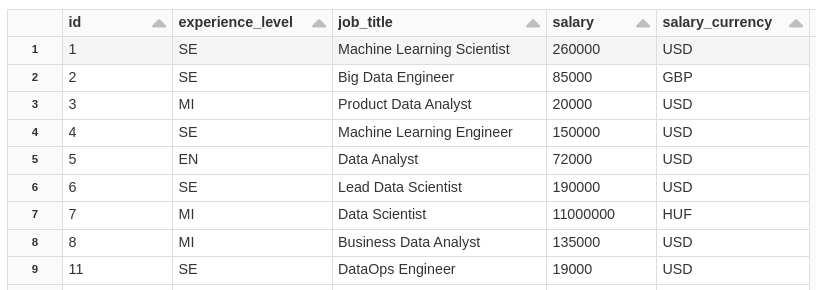
Lines changed.
SELECT * FROM table_changes('salaryDSBronze', 1)
Notice that we have two types of operations _change_type=insert, and how do we take these lines to SILVER?, notice that now I need to better define which version of the line to load, if I run the same code above where position=2, the table of destination will not change because this change already exists there. but now my RANGE starts at _commit_version=3.
MERGE INTO salaryDSSilver USING (
  SELECT
  *
FROM
  (
    SELECT
      *,
      RANK() OVER (
        PARTITION BY id
        ORDER by
          _commit_version DESC
      ) AS RANK
    FROM
      table_changes('salaryDSBronze', 3)
    WHERE
      _change_type != 'update_preimage'
  )
WHERE
  RANK = 1
) AS bronze_cdf ON bronze_cdf.id = salaryDSSilver.id
WHEN MATCHED AND bronze_cdf._change_type = 'delete' THEN DELETE
WHEN MATCHED AND bronze_cdf._change_type != 'delete' THEN UPDATE SET *
WHEN NOT MATCHED AND bronze_cdf._change_type != 'delete' THEN INSERT *;
consulting the table.
SELECT
  *
FROM
  salaryDSSilver
ORDER BY
  CAST(id AS INT) ASC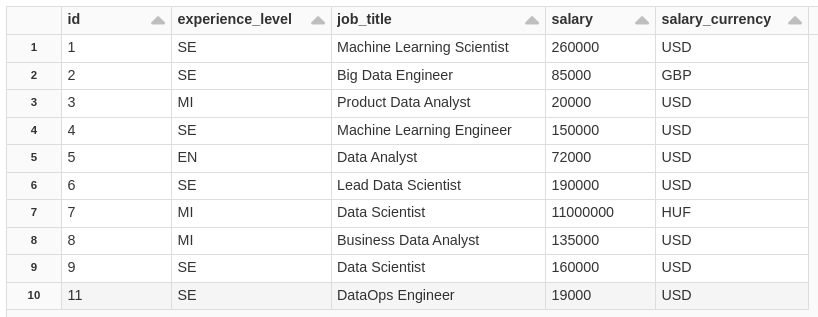
There is a point of attention, in the UPDATE type operation, two lines are generated, one where _change_type=update_preimage and _change_type=update_postimage
update_preimage = Content of the row before an update
update_postimage = Content of the row after the update (what you want to capture downstream)
In this case we need update_postimage, let's go to the example, let's update a BRONZE line.
UPDATE salaryDSBronze SET salary_currency='USD',salary='110000' WHERE id=7;consulting the table.
SELECT
  *
FROM
  salaryDSBronze
ORDER BY
  CAST(id AS INT) ASC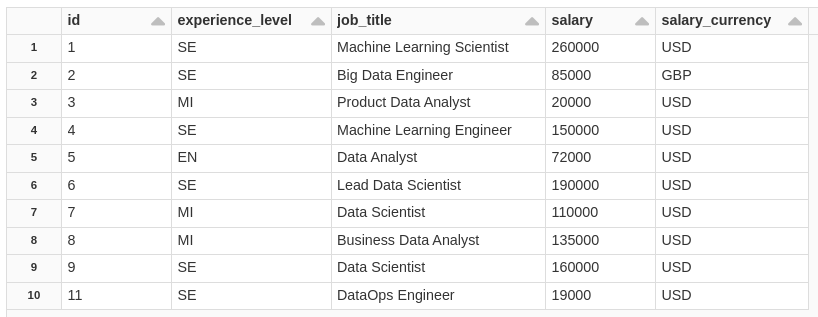
Lines changed.
SELECT * FROM table_changes('salaryDSBronze', 1)Notice that we have two lines of ID 7, one with the _change_type=update_preimage (shows what the data looked like before the UPDATE) and _change_type=update_postimage (change after the UPDATE) for our SILVER let's take the _commit_version=5 and _change_type=update_postimage
MERGE INTO salaryDSSilver USING (
  SELECT
  *
FROM
  (
    SELECT
      *,
      RANK() OVER (
        PARTITION BY id
        ORDER by
          _commit_version DESC
      ) AS RANK
    FROM
      table_changes('salaryDSBronze', 5)
    WHERE
      _change_type != 'update_preimage'
  )
WHERE
  RANK = 1
) AS bronze_cdf ON bronze_cdf.id = salaryDSSilver.id
WHEN MATCHED AND bronze_cdf._change_type = 'delete' THEN DELETE
WHEN MATCHED AND bronze_cdf._change_type != 'delete' THEN UPDATE SET *
WHEN NOT MATCHED AND bronze_cdf._change_type != 'delete' THEN INSERT *;
consulting the table.
SELECT
  *
FROM
  salaryDSSilver
ORDER BY
  CAST(id AS INT) ASC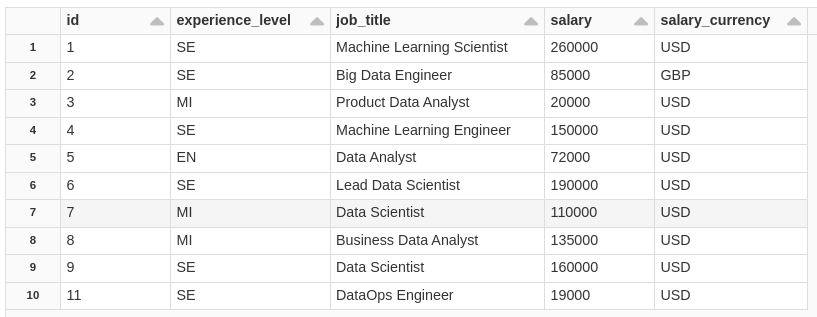
Notice that the ID=7 in the salary field, which before was = 11000000, with the update it was 110000, but what if I want to see what the table was like before this update? simple, see.
SELECT * FROM salaryDSBronze VERSION AS OF 4;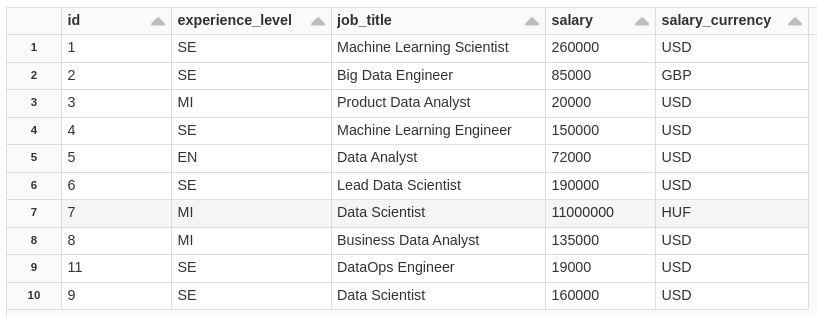
In version=4 of the table I have the original field.
Now let's insert data from SILVER in GOLD, the process is very similar, let's take what was changed in the SILVER table and play in GOLD, but let's see the changes in SILVER
SELECT * FROM table_changes('salaryDSSilver', 1)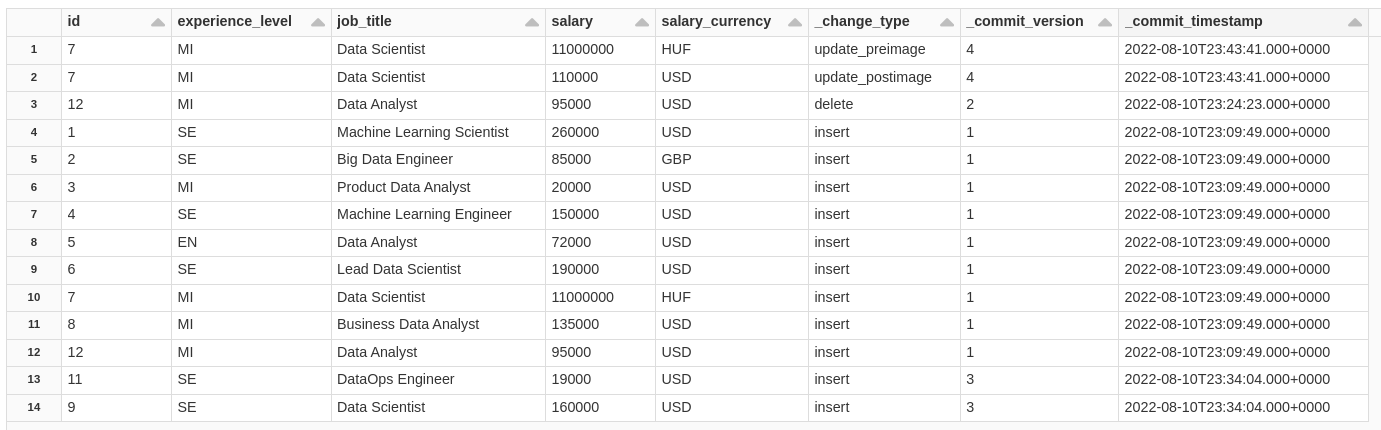
Notice that here we have the 3 operations, INSERT, which were lines that we inserted from the BRONZE, we have UPDATE, we update the ID=7, and we have a DELETE of the ID=12, in this case, we will aggregate the data and MERGE the GOLD
MERGE INTO salaryDSGold USING (
SELECT
  salaryDSSilver.job_title,
  salaryDSSilver.salary_currency,
  SUM(CAST(salaryDSSilver.salary AS FLOAT)) as media_salary
FROM
  salaryDSSilver
  INNER JOIN (
    SELECT
      DISTINCT id
    FROM
      table_changes('salaryDSSilver', 1)
    WHERE
    _change_type != 'update_preimage'
  ) AS silver_cdf ON salaryDSSilver.id = silver_cdf.id
GROUP BY
  salaryDSSilver.job_title,
  salaryDSSilver.salary_currency
) AS silver_cdf_agg ON silver_cdf_agg.job_title = salaryDSGold.job_title
AND silver_cdf_agg.salary_currency = salaryDSGold.salary_currency
WHEN MATCHED THEN UPDATE SET *
WHEN NOT MATCHED THEN INSERT *;
consulting the table.
SELECT * FROM salaryDSGold ORDER BY job_title;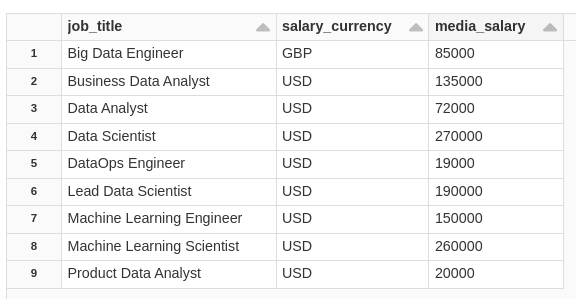
Well I hope you liked it. This was just a very basic example of how to use CDF (Change Data Feed), there are other ways to use this feature, for more information, see the documentation: cdf
See you later, I went.